
This blog will be long. In the last blog on MAG modding, there were several points I talked about that could not be corrected. Since then, many have been, though one or still remain. Since the last blog, my molding and casting skills have reached a whole new level and where I am actually able to make perfectly bubble free parts now.
In the last blog, I had made a 'universal' clear sole part that was made from the sole of a size US13 and was modified to fit my US9.5s. Since then, I have re-designed the entire molding and casting process and now offer 3 different sizes. As it turns out, some sole sizes do actually fit other sizes.
The 3 sizes I make (and sell) are:
Small [fits US8 and US8.5]
Medium [fits US9.5 and US10]
Large [fits US11, US12 and US13]
Crafting New Master Parts


The goal here was not only to cater for those with smaller shoes than a US13, but to also capture details lost in the original molding and casting process. The original master part of the 3D part was cast as a 3D part. There were many fails with air being trapped in the mold. The solution was to break the 3D part down and open back mold them.
Flattened Out Master


As you can see in these images, the finish of the new parts are way better than that of the original part shown above. The parts have to be trimmed and assembled into the complex 3D part prior to attaching them to the shoes.
Making Them More Screen Accurate


Research suggests that the mid-soles of the screen used pairs were originally cast in a white rubber, the clear soles attached and then a light grey texture added over the remaining mid-sole. To better recreate the look of the screen used shoes, I have added white rubber between the grey mid-sole and the clear rubber outer soles. I did not actually end up using the set of soles in the first image above.
New Lettering


These are not the final letters as the master part is not yet machined but will be identical to the graphic above. This master was made on a CNC milling machine and a silicone mold made from that. The castings came from the silicone mold.

The Final Lettering

Upgrading The Lights To EL


12 months ago, I was running LEDs. I had never 'wired' a shoe before and as a result, had a few wire breakages. After 3 repairs, I removed the LEDs for a Glow In The Dark system where I would mix a Cyan glow powder into the clear rubber.
After using GITD for almost a year, I decided to give electrics another go and this time use EL. EL or Electroluminescent sheet is an electrically charged chemical bond that lights up when an AC charge is applied. Unlike LEDs which tend to have "hot-spots", EL lights uni-formally. It requires an inverter to convert DC to AC. The sheet itself is flexible, but can not be bent and is sensitive to shorts along the edges.
Based on the results of the tests, I elected to run a 9V system over the previous 3V system I was running for the LEDs. My tests have given up to 24 hours of continuous run time.
Mounting The Power Supply


Pre-wire, Sole Attachment And A Few New Details

Sculpting The Larger Heel

One thing that makes the MAG look cool is the huge Heel Cup and really low profile mid-sole. To recreate this, I had to remove the Heel Cup, build it up with rubber and re-attach it over the back of the mid-sole. My first attempt that this made it look like a 'growth'. The trimmed look now has a cleaner line.

Casting New Clear Ankle Bubbles

Apart from larger letters, I also wanted to replicate the lower profile of the heel, the more rounded heel cup and larger lights bubble. The new molds are yet to be finalized and these have been free formed over the half mold I have already made.
The Sock Toe

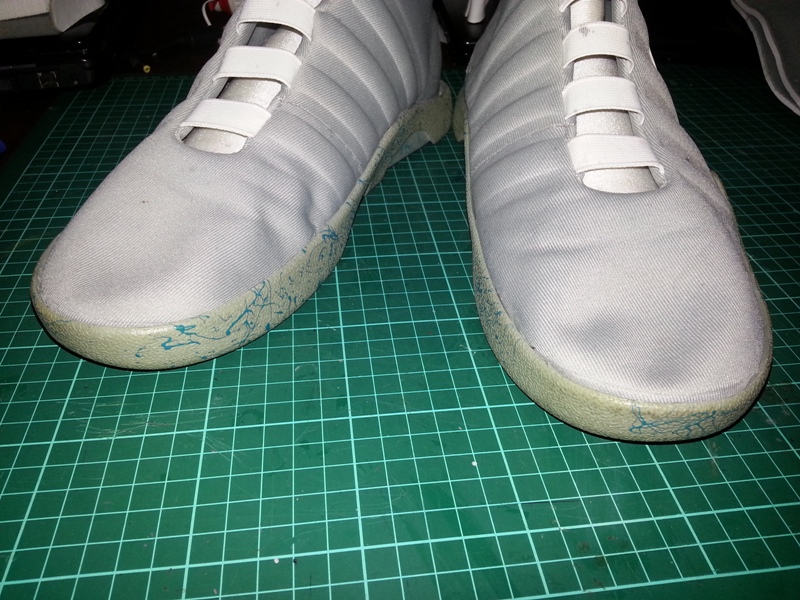

The MAGs seen in the film do not have a toe box. The type of toe on these shoes is called a 'sock toe' and is very comfortable. There are both branded and non branded shoes out now that also have this design.
To make my toe box, I had to open the shoe and remove the toe box. This was done with some heat and patience and once the toe cap is lifted, the stitching is removed and the layers carefully separated. Then the toe box can be removed.
Care must be taken with alignment to ensure the shoe goes back together without distortions and wrinkles.
Light Tests


On Show at SupaNova 2015

Back To Glow In The Dark


After more electrical fails, further testing of the Glow Powder, I have decided to go back to a Passive Illumination System. When mixed at 50% per volume and fully charged, the new Glow system is very bright even in high ambient light environments. And of course, no chance of electrical fails.
#ClearSoles #GlowInTheDark #NikeMAG
Mark

1 comment:
Post a Comment